
.png "horizontal line")

Mintys Mining Guide
3.12.1 edition
─
This will cover the main types of mining
- Hand mining
Not worth the time invested. The rewards are too little for the travelling and work involved (don't bother)
- ROC mining
Very profitable but requires a ship to carry, overall a solid choice
- Prospector/ Mole mining
Also very profitable but has more stages and requires patience. For highest profits will also require hauling of the refined ore
Lets start with ROC mining
What you are going to need for this is an ROC (Remote Ore Collector)
This can be purchased in-game at Lorville New Deal for 172k aUEC or rented from a refinery shop for about 3.5k aUEC. A single run with full hadanite alone will earn enough to purchase one, or even 2 loads with dolivine.
Apart from the ROC you will need a Ship to carry it around and deploy it. The smallest practical ship for this is the Cutlass Black. The Nomad is capable but at time of writing it is still very buggy when loading/ unloading. The refinery rentals also rent out Cutlass Blacks for about 35k aUEC at time of writing. So for 40k aUEC you can get all you need to earn some good money for a day. A million or more can be earned in a day if bugs and 30ks don't hamper you too much.
Before you go and use the ROC it is important to remember that it is not a fully enclosed environment and the elements will affect you. Owning a Novikov undersuit with helmet and a Pembroke suit with helmet is essential for the extreme conditions.
Where to go with my ROC?
Of all the moons in Stanton I have found Aberdeen to be the best for the reason that it has the greatest concentration of Hadanite.
Many other moons are worth visiting and it is worth scouting them out.
The values of the various ROC minables go
Dolivine - lowest
Aphorite - middle
Hadanite - highest
A very important thing to know is that there are players who will hunt down miners. This is just an unfortunate fact. The best plan is to fly down to a random spot nowhere near any areas you can quantum to.
When it's time to sell your cargo full of goodies the best bet is to land at one of the trade outposts dotted around many of the moons. I would further suggest a lesser used one.
The updated mining UI makes the experience more informative and intuitive. [M] to activate mining mode and increase the throttle with mouse wheel or whichever control method suits you until the energy on the rock starts to rise. When it gets into the green you need to balance the throttle to keep it there. If it goes in the red, best bet is to shut the laser off for a second or so and turn it back on and quickly wind it up to about 35-40% to get back to where you were before. When it cracks, switch collection mode fire it up and move the beam over the (gems) and they should be collected. A realtime cargo meter should inform you of how full you are.
When finished with all rocks load up again and rinse repeat.
Prospector / Mole mining
The prospector and Mole follow a common principle with minor variations.
This form of mining can be done in an asteroid belt or on a planetary body surface. It works the same way for both, the only difference is how the ship handles.
The important factors
- Mining laser head
- Consumables
- Shields
1. Mining laser heads have different properties that have strengths and weaknesses. After much experimentation i have found for me the Helix is still overall the best choice. It is the most powerful and you have consumables to call on for stability. The Arbor laser that comes as standard used to be a woefully underpowered but now is a decent starting laser head and will serve you well early on.
2. Consumables can make a great deal of difference depending what you need. They provide stability or a power boost or cooling etc. 90% of the time i only use Optimum which for 20 seconds will increase the charge window (the green area you want to keep the energy level within). Sometimes with a high value high purity ore the charge window can be very small. Optimum can be the difference between cracking that rock and blowing the ship up.
3. I highly recommend upgrading the shields as early as possible as accident still happen. That shield upgrade could make all the difference. A Palisade shield could well be worth the expense.
Where do i go?
Most moons are worth visiting these days, since the refineries were introduced there is good rocks to be found on most moons and asteroid fields. Like with the ROC it is worth exploring and finding places you like.
Just like ROC mining, stay away from points you can quantum to, stay safe.
Focusing on the Prospector moon mining. When you arrive near the surface stay fairly close to ground and pick a direction, can be worth finding a quantum point thats visible and setting route to it so it shows up on HUD. The method i prefer is to roughly follow a line in that direction and use (ping) scan until something shows up. When something shows up on ping fly toward it and keeping pinging until you are close enough to identify what sort of rock you have found. A rock that is prospector/ Mole minable with have a stone symbol. A ROC minable will have a diamond symbol.
Once you have identified a rock appropriate for you use active scan to check the attributes of the rock. The main details you are looking for are firstly what sorts of mineral are present then what % of any mineral that is valuable.
Mineral order of value goes thus
Quantanium = 44.00
Bexalite = 22.00
Taranite = 17.60
Borase = 17.60
Laranite = 15.40
Agricium = 14.30
Hephaestanite = 7.92
Titanium = 4.40
Diamond = 3.63
Gold = 3.13
Copper = 3.08
Beryl = 2.31
Tungsten = 2.09
Corundum = 1.38
Quartz = 0.77
Aluminum = 0.66
Inert Material = 0.02
I would suggest not worrying too much about anything with a lower value than Agricium, after that the value drops fast.
If the rock you identify has some of the more valuable minerals then you need to start thinking about whether or not you can crack that rock.
In recent patches the most important statistics have become Mass and Resistance.
If a rock has a mass of over 6000 and a resistance of .40 or higher the chances or cracking that rock are slim. Even if with alot of patience you manage it the time used will make it very time inefficient.
In time and with experience you will be able to gauge the mass and resistance ration and work out at a glance if it is viable.
This becomes much less important if you are in a multi crewed Mole where the other lasers can help out and make that rock attainable. This is why i believe the prospector lasers have been tuned so they cant crack all rocks now.
Differences with the Mole
The main difference with the Mole is you have 3 mining laser turrets instead of one, also the pilot is a separate role.
Like the Prospector i suggest Helix laser heads again but size 2. The exception is that having one of the turrets fitted with a lancet laser head is very beneficial.
The reason for choosing a Lancet for one of the turrets is that it is essentially a “support” laser head. The Lancet decreases the stability on a rock it is being used on. The result is that the other turrets that are mining that rock will find the optimal charge window noticeably larger.
Consumables
This will cover the available mining consumables and their viability and uses
Brandt | |
Instability | -75% |
Charge Window Rate | -50% |
Heat Generation | +10% |
Signature Size | +20% |
Duration | 90 sec |
Charges | 5 |
aUEC | 2250 |
On paper looks decent but in practical usage is not very useful - Disregard
Rime | |
Charge Window Level | -50% |
Heat Generation | -30% |
Signature Size | +30% |
Duration | Instant |
Charges | 5 |
aUEC | 1100 |
Another one that looks useful on paper but in reality has little practical use - Disregard
Torpid | |
Charge Rate | -20% |
Resistance | -20% |
Heat Generation | -20% |
Signature Size | -30% |
Duration | 30 sec |
Charges | 5 |
aUEC | 1950 |
The minus heat and resistance are useful bot the lower charge rate limits the usage scenarios - Not something i use
Stampede | |
Charge Rate | +125% |
Charges | 5 |
Duration | 60s |
aUEC | 1400 |
Looks on paper like it could help with harder to crack rocks but in reality it does nothing to help - Disregard
Lifeline | |
Shatter Damage | -90% |
Duration | 20 sec |
Charges | 5 |
All Charge Rates | -90% |
aUEC | 800 |
This consumable is the first of the ones i think is truly useful. While not quite an emergency stop button it can effectively bring an overcharged rock under control again. However you will have to be quick activating it. Best usage is to shut off the laser then re activate the laser on minimum throttle and activate this consumable - Useful, good choice for third consumable slot for the newer miner
Surge | |
Total Charge Level | +40% |
Shatter Damage | +200% |
Catastrophic Charge Rate | +100% |
Duration | Instant |
Charges | 5 |
aUEC | 1400 |
This is quick a dangerous consumable but i find used well very effective.
Best use case scenario is if you find a rock very hard to crack this can deliver an instant boost but the timing is critical. Best use for it is at no higher than 20 - 30% otherwise you can instantly find yourself in the red. The way i have used this is to immediately follow it with a forel consumable which can bring the charge level up the rest of the way. These two consumables can synergise quite well - Useful and my personal choice for third slot (but beware)
Forel | |
Resistance | -20% |
Instability | +10% |
Shatter Damage | +50% |
Duration | 90s |
Charges | 5 |
aUEC | 1950 |
Main stat you need to concern yourself with is the -20% resistance. This will lower the resistance level of the rock by 20% making what would otherwise be a rock impossible to break actually possible. The very long duration means it often is able to break the rock without needing to activate a second. As hinted to in the Surge section when combined with consumable it is amazing what sort of rocks you can break with effective usage of both - very useful and always fills my second slot now
Optimum | |
Optimal Charge Window | +75% |
Instability | +10% |
Duration | 20s |
Charges | 5 |
aUEC | 3000 |
My personal favourite and has always been useful. This used to increase the optimal charge window (the green area you are aiming for) by 100% but 75% is still very useful. Best use for this consumable is some of the high value high purity rocks can have a very small optimal charge window. Best time to use this one because of the small duration is to wait until your energy level actually reaches the window. Best be ready to activate it again if need be - Extremely useful, occupies a permanent place in my first slot
Selling
Mined ore can now only be sold at a refinery. The L1 stations are the ones with refineries. You can sell the raw ore at a terminal but the value is no longer what it was. It is now much more viable to refine it first. This takes us to a whole different section.
Refineries and me
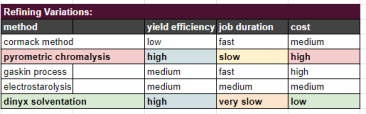
I suggest using patience and choosing Dinyx, the wait can be over a day but worth it for the yield and cost saving.
Once the ore is refined you need to go back to the refinery terminal and Collect. You will need to choose where it gets delivered, this will have to be a ship.